Imagine controlling your home’s lighting with just a tap on your phone or a simple voice command. Installing smart lights can make your space more convenient, energy-efficient, and even safer.
But if you’re worried it might be complicated or expensive, don’t be. This guide will walk you through easy steps to install smart lights at home, no matter your experience level. By the end, you’ll know exactly how to brighten your rooms smarter and start enjoying the benefits right away.
Ready to transform your home lighting? Let’s get started!

Credit: www.youtube.com
Choosing The Right Smart Lights
Choosing the right smart lights is key for a smooth and useful home setup. Picking the best lights can save time and money. It also makes your home more comfortable and modern. Understand what type of smart bulbs suit your needs. Check if the lights work with your home system. Think about your budget before buying.
Types Of Smart Bulbs
Smart bulbs come in many styles and functions. Some bulbs change colors. Others adjust brightness automatically. There are bulbs with built-in speakers or motion sensors. Choose bulbs that fit your room size and style. Decide if you want simple white lights or colorful ones. Each type offers different benefits.
Compatibility With Home Systems
Smart lights must connect easily with your devices. Check if they work with Alexa, Google Home, or Apple HomeKit. Some bulbs need a special hub to function. Others connect directly to Wi-Fi. Make sure your phone or voice assistant controls the lights. This step avoids future problems with your setup.
Budget Considerations
Smart lights vary in price. Basic bulbs cost less but have fewer features. Advanced bulbs offer more control but are pricier. Set a budget before shopping. Buy only the number of bulbs you really need. Remember, quality matters more than quantity. Good bulbs last longer and save energy.

Credit: www.onedegreewest.tv
Gathering Necessary Tools
Before starting your smart light installation, prepare all tools. Having the right tools saves time and avoids frustration. It helps you work safely and smoothly.
Basic Tools Needed
You will need a screwdriver, usually a flathead and a Phillips. A voltage tester is important to check for live wires. Wire strippers help remove insulation from wires. A drill might be necessary for mounting fixtures. Keep a ladder handy for reaching high spots.
Optional Accessories
Smart light installation can be easier with some extras. Electrical tape secures wire connections well. Wire nuts help join wires safely. A level ensures your fixtures hang straight. A flashlight is useful in dark areas. A smartphone or tablet will help with smart light setup.
Safety Gear
Safety is key during installation. Wear insulated gloves to avoid electric shock. Safety glasses protect your eyes from dust and debris. Use non-slip shoes for stable footing. Make sure your work area is well lit. Turn off power at the breaker before starting.
Preparing Your Home Setup
Preparing your home setup is the first step to install smart lights safely. This stage ensures a smooth installation and prevents damage or accidents. Take time to get everything ready before starting the work.
Checking Light Fixtures
Look at the light fixtures you want to change. Make sure they fit the smart bulbs or smart switches. Some fixtures may need adapters or special bulbs. Check the size, shape, and type to avoid issues.
Turning Off Power
Always turn off the power at the main circuit breaker. This stops electricity flow to the light fixture. It helps avoid shocks or short circuits. Use a tester to confirm the power is off before touching wires.
Clearing The Work Area
Remove furniture or objects near the light fixture. Give yourself enough space to move and work comfortably. Clean the area to avoid dust or dirt from entering the fixture. A clear space keeps the process safe and easy.
Installing The Smart Lights
Installing smart lights is a simple process anyone can follow. It brings modern lighting control to your home quickly. The right steps ensure your smart lights work perfectly from the start.
Follow these clear steps to remove old bulbs, install new smart ones, and test them safely. This guide helps you get the best from your new lighting system.
Removing Old Bulbs
Turn off the power to the light fixture. Let the old bulbs cool before touching them. Gently twist each bulb counterclockwise to remove it. Place the old bulbs somewhere safe for recycling or reuse. Check for any dirt or damage in the socket before installing new bulbs.
Installing New Smart Bulbs
Take the smart bulb out of its packaging carefully. Align the bulb’s base with the socket. Twist the bulb clockwise until it fits snugly. Do not force the bulb in place. Ensure the bulb is secure but avoid overtightening. Repeat for each light fixture you want to upgrade.
Powering On And Initial Testing
Switch the power back on at the circuit or wall switch. Wait a few seconds for the smart bulb to light up. Look for any blinking or color changes that show it is ready. Use the smart light app or remote to test basic functions. Adjust brightness and colors to confirm full control. Troubleshoot by checking the bulb’s connection or app setup if needed.
Connecting And Customizing
Connecting and customizing smart lights lets you control your home lighting easily. It makes your life more comfortable and energy-efficient. Follow simple steps to link your lights to apps, set schedules, and fix common problems.
Linking To Smart Home Apps
Start by downloading the smart light app. Open the app and create an account if needed. Turn on your smart light and make sure it is in pairing mode. The app will search for nearby devices. Select your smart light from the list. Follow the on-screen instructions to connect your light to Wi-Fi. Once connected, you can control the light from your phone or tablet.
Setting Up Schedules And Scenes
Open the app and find the scheduling option. Choose the time you want the light to turn on or off. Set different schedules for weekdays and weekends. Use scenes to create moods. For example, a reading scene with bright light or a relaxing scene with soft light. Save your settings. Your smart lights will change automatically based on your choices.
Troubleshooting Common Issues
If the light does not connect, check your Wi-Fi signal. Make sure the light is close to the router. Restart the light and your phone. Update the app and the light’s firmware. If the light flickers, try resetting it. Remove the device from the app and add it again. Contact customer support if problems continue.
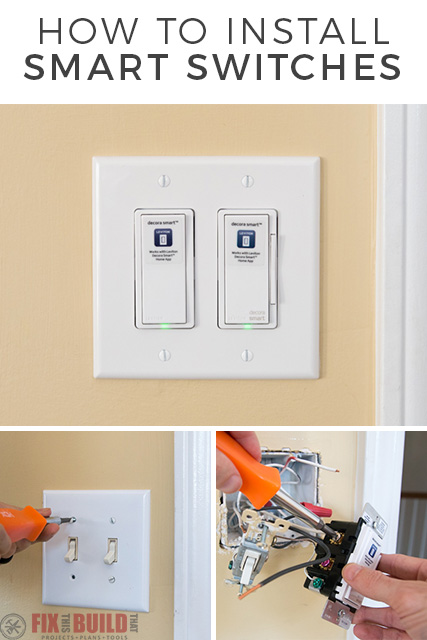
Credit: fixthisbuildthat.com
Frequently Asked Questions
What Tools Do I Need To Install Smart Lights At Home?
You need a screwdriver, smart bulbs, a smartphone, and a stable Wi-Fi connection.
How Do I Connect Smart Lights To My Wi-fi?
Use the smart light app to follow step-by-step instructions for Wi-Fi setup.
Can I Install Smart Lights Without Professional Help?
Yes, smart lights are designed for easy DIY installation with simple instructions.
Are Smart Lights Compatible With All Home Light Fixtures?
Most smart bulbs fit standard fixtures, but check bulb size and socket type first.
How Do I Control Smart Lights After Installation?
Control smart lights via a smartphone app or voice assistant like Alexa or Google.
Conclusion
Smart lights bring ease and style to your home. You can control them with your phone or voice. Installation is simple and does not take long. Choose the right bulbs and follow the steps carefully. Enjoy saving energy and setting the perfect mood.
Small changes make a big difference in daily life. Start today and brighten your space smartly.